Tag Archives: tutorial

Easter Project: Cake Pops!

29 Mar

059b-2 copy2

Here it is, our last easter project: Chick & bunny cake pops!

I was thrilled to use my cake pop machine for the very first time! I used a regular vanilla cake recipe (with butter, not oil) and simply substracted a little bit of milk to make sure the batter was quite thick. See the results… Beauuutiful! The best part was how amazingly round and perfect those little balls of cake were! They were already cute as is… BUT, they would eventually be even cuter with pretty bunny ears and bow ties! ^^

010-2

We used candy melts to secure the lollipop sticks in the cakes. Candy melts are easy-to-melt wafers, ideal for dipping cake pops. They come in a variety of colors and taste like very sweet white chocolate!  Make sure not to overheat yours like I did, because it will be unusable. Your chicks will end up looking like zombie heads. And I’m not joking- that thing was creepy.

Lucky me I had some more wafers at hand! Ha!

Using an empty egg carton to hold them straight proved to be a very efficient method! Off to the freezer for 5 min. and they were ready to take a dip!

033

And because making bunny and chick cake pops wasn’t nearly enough, we decided to make a CRAZY CUTE garden display as well!

With a block of oasis foam, hot glue, coffee sticks, green paper, easter eggs from the dollar store and a little bit of patience, it’s amazing what you can do!

003b

While Catherine worked on the garden, I worked on the bunny ears. All there was left to do was assemble it all… and take a bite! Or two!

Isn’t this a good-looking chick or what? Awww!

051

043-3

Happy Easter everyone!

Easter Egg meets Fortune Cookie

25 Mar

fortune easter eggs

I am so happy to share this DIY with you guys since Catherine and I had so much fun doing it. It was heartbreaking cracking one to take pictures but hey, that’s what they’re  made for! These fortune easter eggs are a fun handmade gift  you can give to absolutely anyone.

It was my first time cleaning out eggs, therefore I used this great step by step tutorial and it was easier than I thought it would be! Didn’t even break one!

I used a pin the poke holes in the eggshell and a toothpick to pierce the yolk. Then I just blew out the contents, cleaned them under running water and put them 20 seconds in the microwave. It dries and hardens the eggshells.

009-2

We then proceeded to painting the eggs with acrylic paint. After making a complete mess, we finally figured it was way easier to insert a wooden skewer all the way through the egg. This way, we could paint 360′! Yay!

And Voilà!

029-2

The next step is finding some witty easter-themed messages to put inside you eggs. Here’s what we came up with!

013-2

The only thing to do next is to roll those really thight and insert them inside the eggs! There you go, your fortune easter eggs are ready to hatch!

You could even use these to plan an easter egg hunt, inserting clues instead of furtune messages!

Happy easter crafts!

Scary DIY haircut works magic!

18 Mar

ponybanner2

Three weeks ago, I stumbled upon a tutorial by Diary of a Mad Crafter about cutting your own hair; an easy five-minutes layers cut. UN-BELIEVABLE.

I used to work at a hair salon and have my hair cut all the time (btw I am by no means a hairdresser!). Since I’ve stopped working there, I have decided to grow my hair out. As Catherine made me notice yesterday, it is quite long now, longer than it has been over the past ten years. But as I’VE noticed, it is also very damaged. And very blah. And in desperate need of layers!

This morning, TADA – the sun was shining, I had the day to myself and I needed nothing more to have the guts to try this very scary DIY!

CHOP CHOP

076-2

The steps are quite easy to follow. I started by quickly straightening my hair. Although it is not necessary, I felt it would be easier for what was to come.

First, you brush your hair until it is completely untangled. Then, with your head upside down, you tie your hair into a ponytail. The placement of the ponytail will decide the length of the layers. If you want to start slowly, tie it at the top-back of your head. The more forward you put your ponytail, the shorter the layers will be.

I actually started at the back, but did it again with the ponytail right on top of my head because I felt like the layers were too long.

You then bring the end of your ponytail in front of your face, brushing it to straighten every hair.

Then -OMG- you just cut straight across.

Here’s a peak at what it looked like BEFORE:

Bulky, dry – don’t even want to look at it anymore…

ponybefore copy

And AFTER:

I really love the outcome! The main thing is really how healthy my hair feels now (I needed a cut so bad!) It looks a lot lighter too. I can’t wait to wash my hair as I’m sure this cut will enhance those natural curls!

ponyafter

What do you think? Should I go with shorther layers next time?

Do you have the guts? :P

Peter Pan Studded Necklace DIY

1 Mar

peterpandiy2

The idea occured to me while shopping with my sister at the mall, looking at all those pretty Peter Pan collars. I had bought a bunch of studs on Ebay a while ago and never settled on any project to put them to use.

Now is the time for an easy/pretty/studs DIY!

Let me take you through the steps!

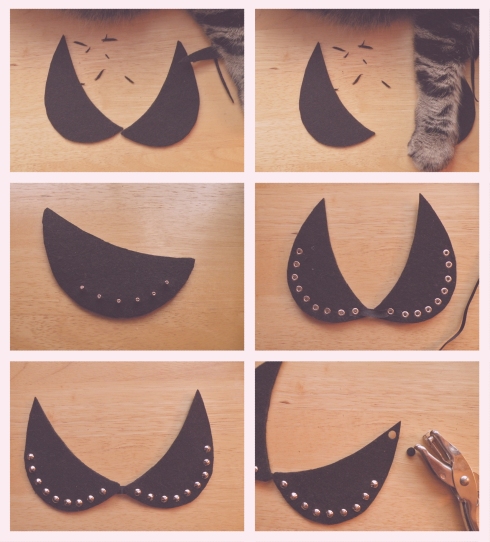
If you decide to attempt this DIY, please make sure that it is done only under strict cat supervision.

peterpansteps2

First, I cut out two symetrical shapes out of back felt. Hold them around your neck in front of the mirror and make adjustements to the size or shape.

Then, use a pencil (I used a lip liner) to mark the spots, on the back of your shape, where your want your studs to be.

I didn’t have the right tools to put the studs in, so I just used a pin to poke holes through the felt and enlarged the holes whit a pointy exacto knife. I Put both parts of the studs in place and finished it hammer style

Use a paper punch to add holes to each piece of the collar and tie pretty ribbons.

Here is the final look. Tell me how you like it!

peterpan2

Please follow us on Pinterest and don’t forget to check out our Facebook  page for more!